Skip to content
  • English
    • French
    • Italian
    • Spanish
    • German
    • Dutch
    • Portuguese (Portugal)
    • Greek
    • Polish
  • English
    • French
    • Italian
    • Spanish
    • German
    • Dutch
    • Portuguese (Portugal)
    • Greek
    • Polish
Logo Avidsen
  • Products
    • Products
    • Avidsen Brand
    • Extel Brand
    • Philips Brand
    • Thomson Brand
  • Support
    • Tutorials on repair and use
    • Avidsen Technical Support
    • Extel brand technical support
    • Philips technical support
    • Thomson Technical Support
  • The Group
    • The Group
    • Contact
  • Ethic Company
  • Where to buy ?
\

Wifi connection Rheita 100 camera – Beeper method

  1. Home
  2. Wifi connection Rheita 100 camera – Beeper method

Wifi connection Rheita 100 camera – Beeper method

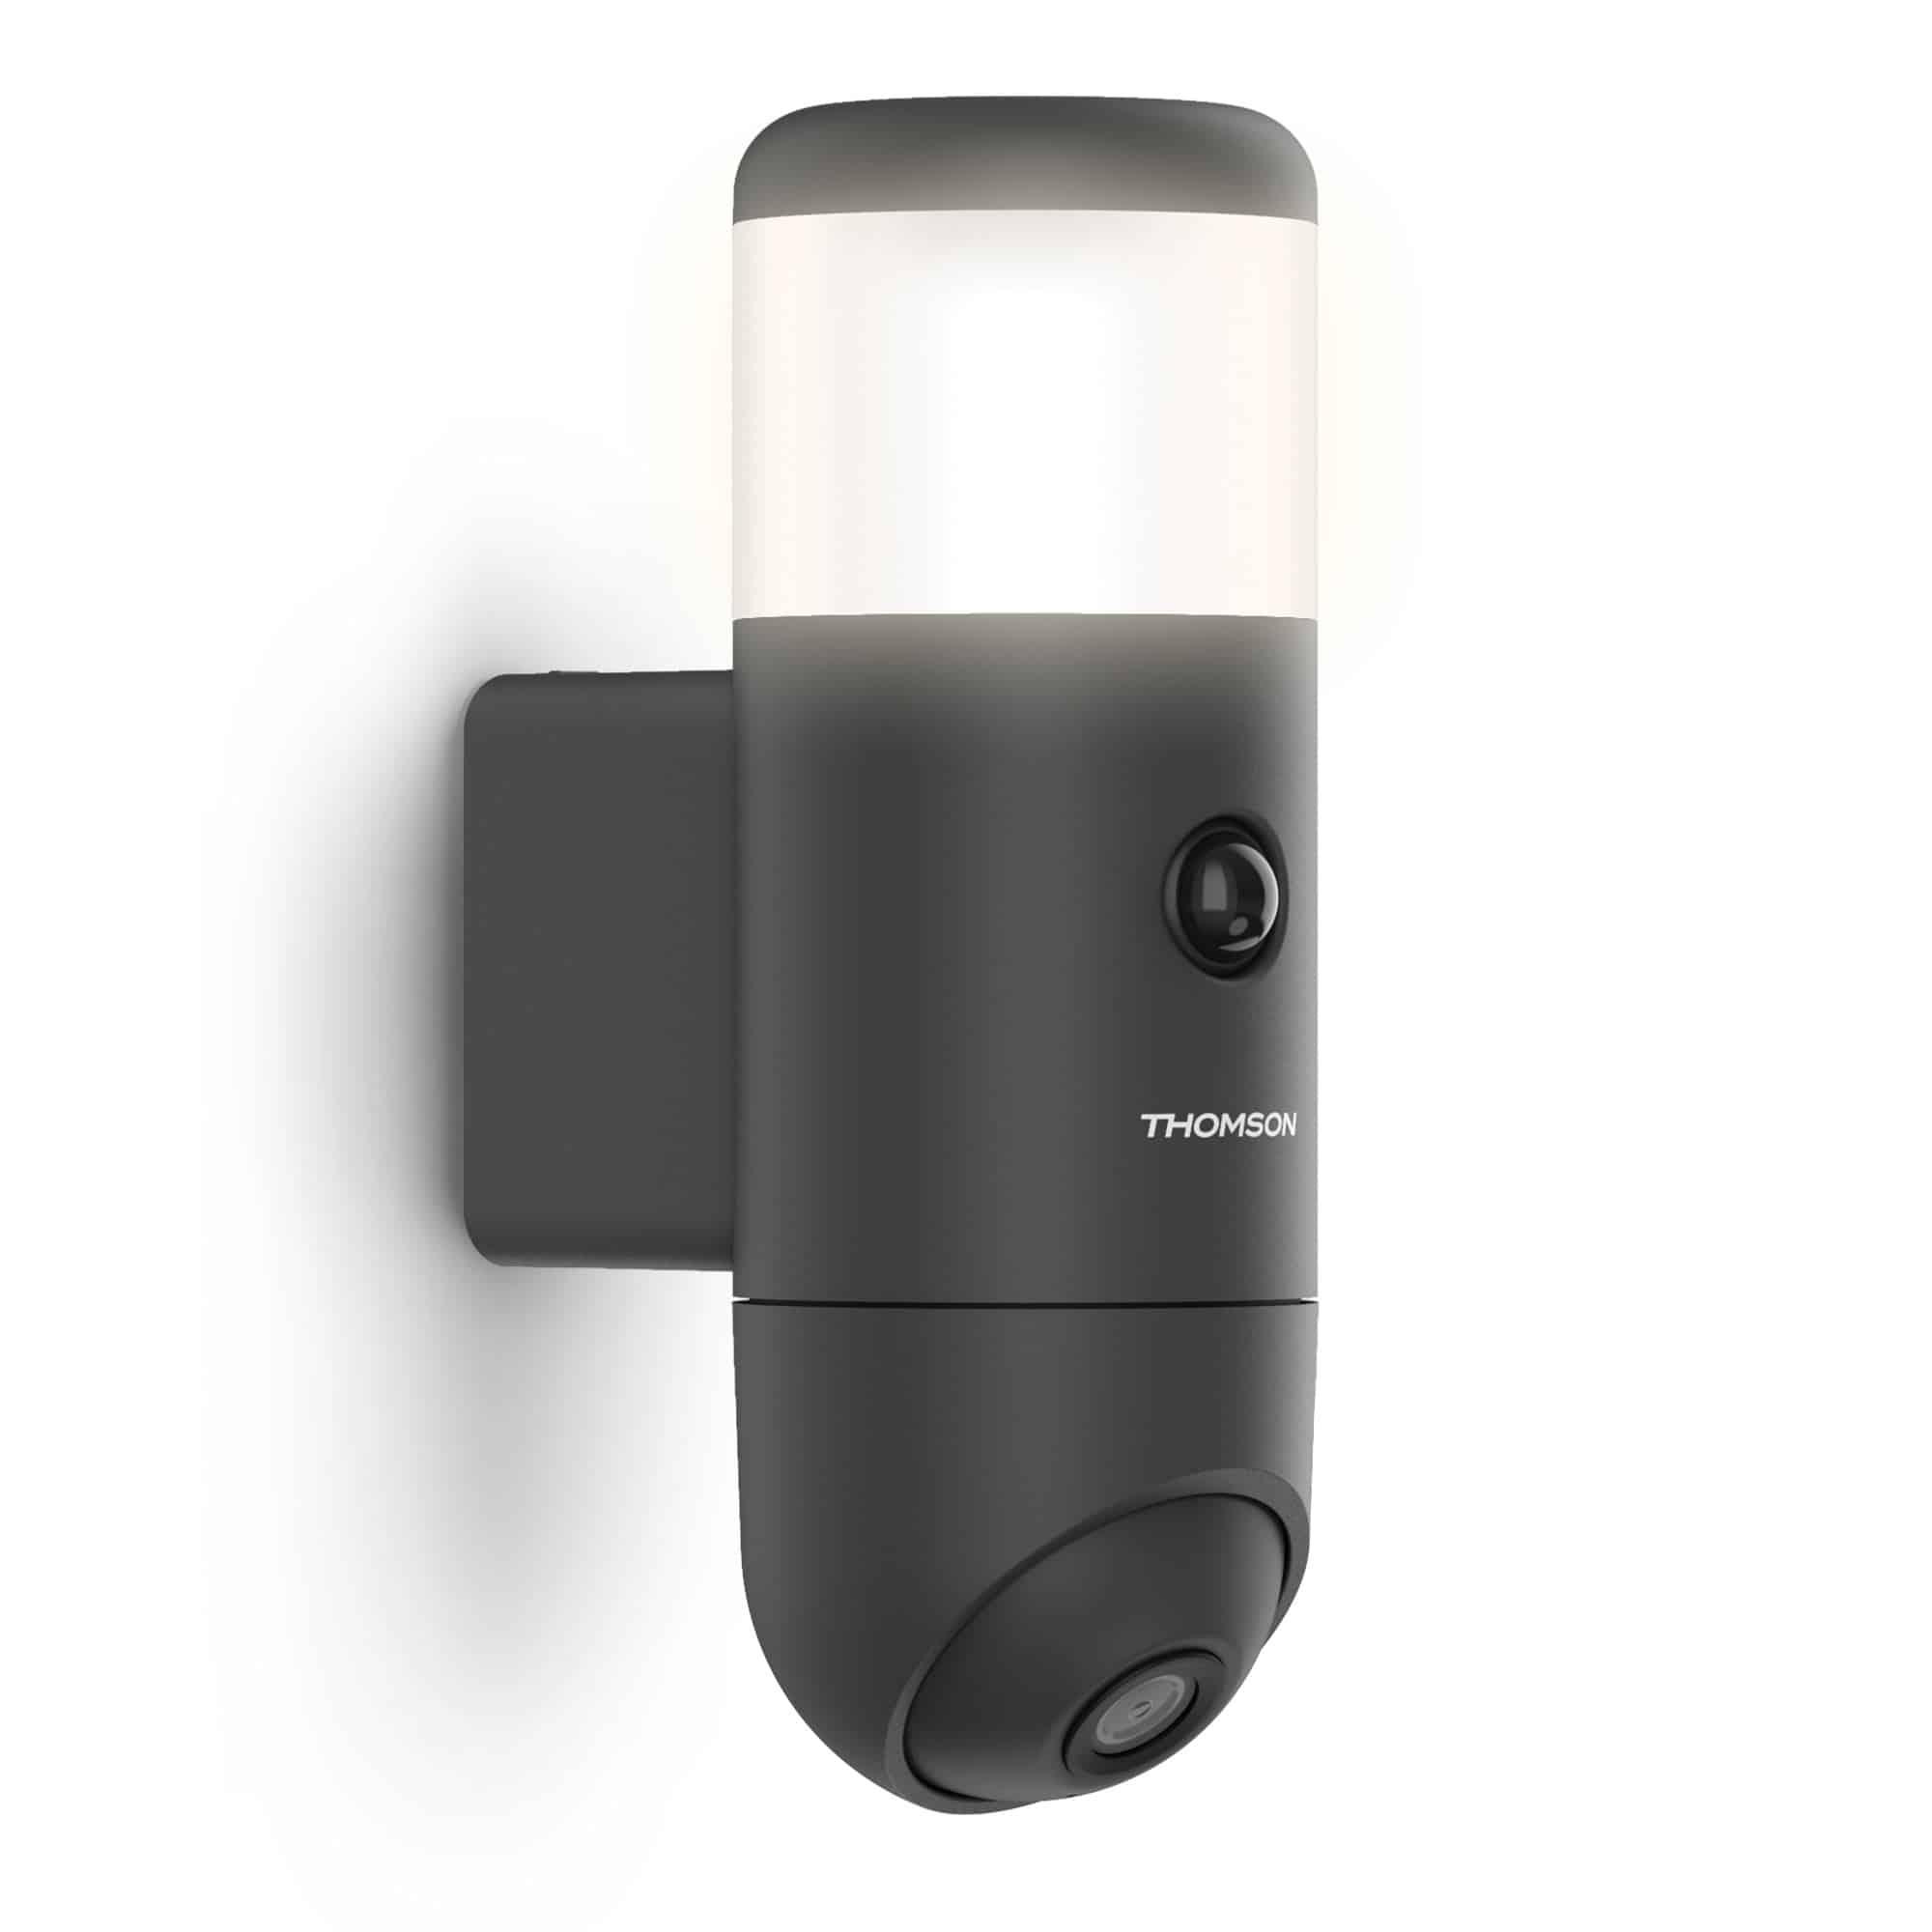
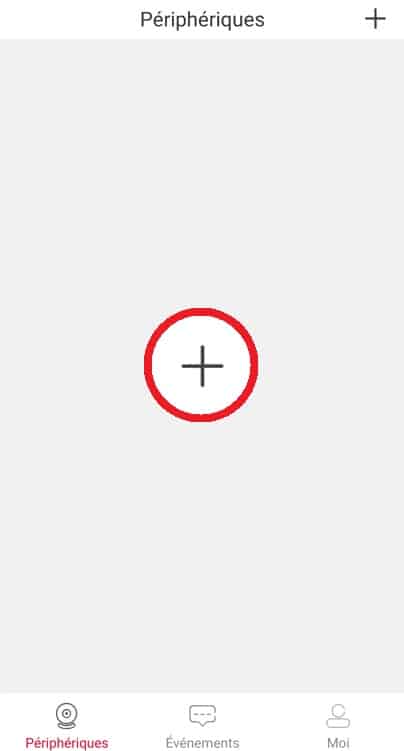
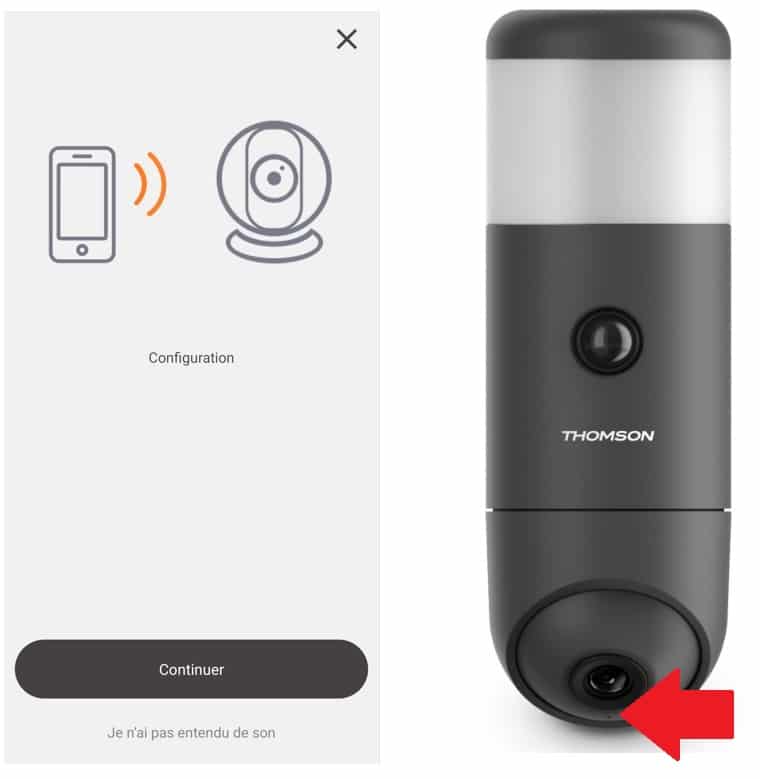
In this tutorial, we'll show you how to get a Rheita 100 camera online using the beeper method. 
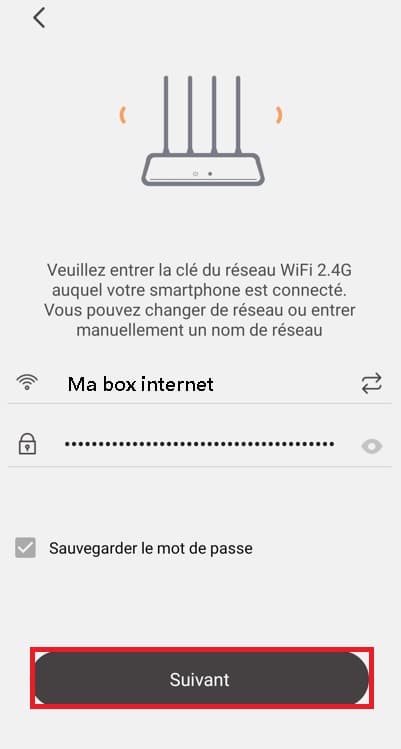
For simplicity's sake, the procedure should be carried out close to your Internet box ( recommended ). Please note that if you change your Internet box, you will need to carry out the association procedure from step 1 after deleting the camera from the application. 
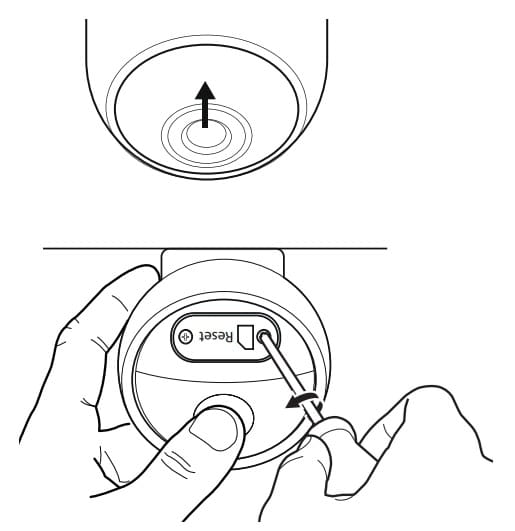
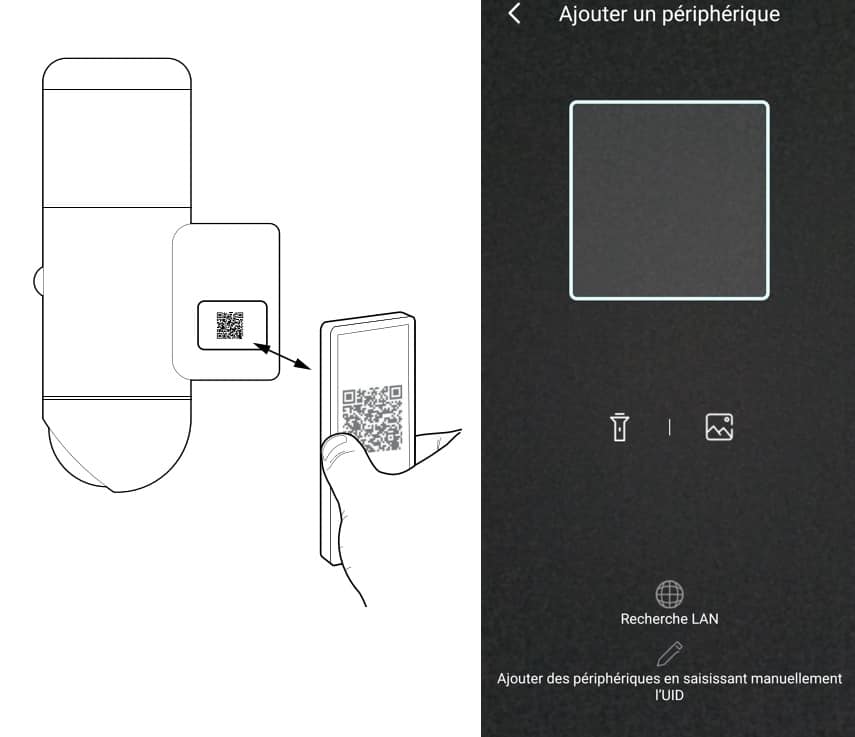
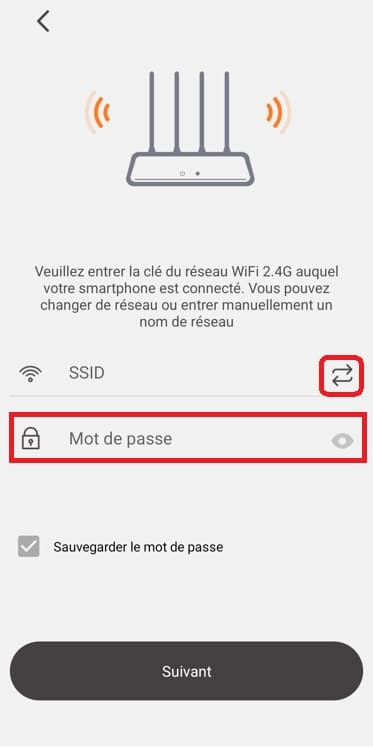
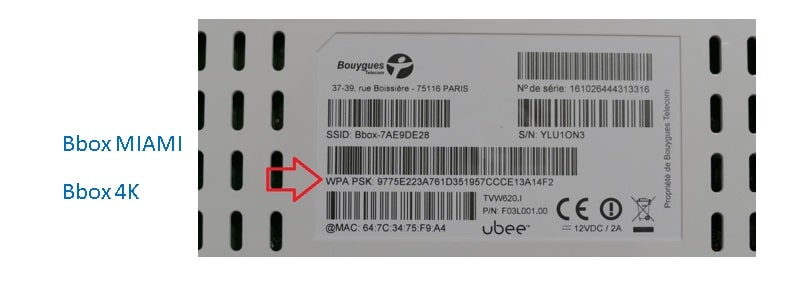
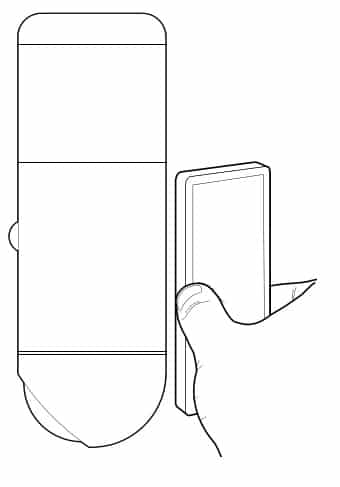
Make sure you have the camera's QR code. If you lose this QR code, your camera will be unusable.

This tutorial is applicable for:

Thomson - 512511 - Rheita 100
Difficulté : Easy
Temps nécessaire : 5 minutes
Nombre d’étapes : 4
Mise à jour : February 2025

Tutorial steps:

Step 1: Check camera connection status

  • Before connecting, please check that the camera is powered by a 230V supply. If you have installed the camera in place of an old lighting system, make sure that the switch controlling it is activated.
  • Tilt your camera’s optics upwards.
  • Then remove the camera compartment cover with a Phillips screwdriver.
  • Press your camera’s “Reset” button for 3 seconds until you hear a beep.
  • Wait about 1 minute for your camera to reset.
  • During the reset phase, the camera’s optics perform a horizontal right/left movement and emit a start-up melody (two series of five notes).

Step 2: Wifi association

  • Download the At Home security application from your smartphone’s googlePlay store or appStore.
  • Make sure your smartphone is connected to your Internet box’s 2.4Ghz Wifi network (not compatible with 5Ghz Wifi networks).
  • Launch the application and click on “+”.
  • Scan the QR code on the camera
  • If you have difficulty scanning the QR code, remember to move away from the camera.
  • Be careful not to lose the QR code. If you lose it, your camera will be unusable.
  • The message “Request in progress” will appear. Please wait a few seconds.


  • The application will ask if the camera has been correctly reset.
  • If you have performed step 1 correctly, please press “Reset successful”.
  • If you have skipped step 1, please do so and make sure the camera has played its start-up melody (two series of five notes), then press “Reset successful”.
  • Check for a network name (SSID) to the right of the symbol

If the network name doesn’t appear, go to your smartphone’s authorizations and check that the “Position” or “Location information” authorization is granted.

  • Enter your Internet box’s WIFI key.
  • Please note that the Wifi key must not be longer than 18 characters. The Wifi key must contain letters and numbers only.
  • Please follow step 3 before clicking next.

Step 2.1: Where to find the ORANGE operator Wifi key

  • LiveBox 4 = The wifi key is visible by clicking on the i on the front of your Livebox.
  • LiveBox 5 = The wifi key is located on the identification card and also on the label on the back of your Livebox.
  • LiveBox 6 = The wifi key is visible in the Wifi settings accessible from the front screen.

Step 2.2: Where to find the SFR operator Wifi key

  • SFR NB6/NB7/NB8 = The wifi key is located on the label on the back of your SFRBox.

Step 2.3: Where to find the Bouygues operator WiFi key

  • Bbox Miami/ 4K = The wifi key is located on the label on the back of your Bbox. It is the code written on the WPA line.


Step 2.4: Where to find the Freebox operator Wifi key

Valid for Freebox Delta/Pop/Révolution/mini/One/4G+/Crystal

  • Please download the “Freebox Connect” application available on the AppStore and Google Playstore.
  • Select your Freebox model and log in.
  • The wifi key for your Freebox is located in the “My Wifi Access” menu.

Step 3: Connecting the camera

  • Position your smartphone a few centimetres from the camera and turn up the sound on your smartphone to maximum.
  • Then press “Next”.
  • Your smartphone will emit a shrill ringtone that the camera’s microphone should hear.
  • Do not click on “Continue”.
  • Please remain close to the camera until it emits a connection melody.

Step 4: Recording and securing the camera.

  • If you reach this screen, your camera is now connected.
  • Please name your camera to make it easier to recognize in the application.
  • Then press “Save”.
  • Please enter and confirm a password to secure your camera.
  • Press “OK”.
  • Your camera is now registered in the application. You can tap on the image to view it.

Bonus step: remove the camera

  • In the event of a connection error, change of internet box or if you wish to delete the camera, please click on camera settings, then settings.
  • Then “delete”.
Keep in touch
Youtube Linkedin

Follow us on social networks

About Avidsen
  • Who are we?
  • Contact
  • Who are we?
  • Contact
Support
  • Avidsen Technical Support
  • Extel brand technical support
  • Philips technical support
  • Thomson Technical Support
  • Avidsen Technical Support
  • Extel brand technical support
  • Philips technical support
  • Thomson Technical Support
Avidsen group brand
  • Avidsen Brand
  • Extel Brand
  • Philips Brand
  • Thomson Brand
  • Avidsen Brand
  • Extel Brand
  • Philips Brand
  • Thomson Brand
Copyright 2025 © All rights reserved Avidsen
  • Legal Notice
  • Personal data protection policy
  • Terms and Conditions of Use
  • Legal Notice
  • Personal data protection policy
  • Terms and Conditions of Use
Thank you for your rating!
Thank you for your rating and comment!
This page was translated from: French
Please rate this translation:
Your rating:
Change
Please give some examples of errors and how would you improve them: